A practical guide to screenshot annotation tools for UX designers, covering which platforms handle design feedback best, how to structure annotations for developer handoff, and when to use annotations versus inline Figma comments.
TLDR: Screenshot annotation tools for UX designers fall into two categories: feedback and review tools (Markup.io, BugSmash, Beep) and research documentation tools where annotations capture design intent on captured references. For research annotation specifically, InspoAI's notes and tagging system on captured screenshots provides the most frictionless workflow.
Table of Contents
- What is screenshot annotation and why do UX designers use it?
- What are the main use cases for screenshot annotation in UX work?
- Which screenshot annotation tools are most popular among UX teams?
- How do you annotate screenshots for developer handoff?
- What makes a good annotation: common mistakes to avoid?
- How do screenshot annotations differ from Figma comment workflows?
- Can screenshot annotation tools support async design feedback on remote teams?
- Conclusion
Introduction
Screenshot annotation is one of those UX skills that every designer uses but few have systematized. The typical workflow is: take a screenshot, open Preview or Paint, add some arrows and text boxes, export as a new image, paste into Slack or email. The result is a annotation that exists in exactly one place and becomes outdated the moment anything changes.
Dedicated screenshot annotation tools solve this by keeping the annotation layer live, attached to the source URL, and shareable with threaded comments. For UX designers who communicate with developers, stakeholders, and clients daily, the upgrade from ad hoc annotations to structured annotation tools is significant.
This guide covers the current annotation tool landscape, the most important use cases, and how to choose the right tool for your specific workflow.
What is screenshot annotation and why do UX designers use it?
Screenshot annotation is the practice of adding visual markers, comments, and explanatory text directly on top of a screenshot to communicate specific observations, design decisions, or feedback to another person.
UX designers use annotation in three primary contexts:
Design feedback: A designer annotates a screenshot of a competitor's product to note what works ("excellent micro-animation on form validation") and what does not ("contrast ratio on this secondary button fails WCAG AA").
Developer handoff: A designer annotates a Figma screenshot or prototype screen to specify exact measurements, interaction behaviors, and edge cases that are not obvious from the design file alone.
Stakeholder review: A designer annotates a proposed design screenshot to pre-empt likely questions from stakeholders by labeling key decisions and their rationale directly on the image.
According to BugSmash, annotation tools reduce back-and-forth communication cycles in design reviews by up to 60% because the feedback is precise and visual rather than descriptive and text-based.
The upgrade from informal annotations (Preview, MS Paint) to dedicated tools is primarily about persistence and collaboration: dedicated tools keep annotations live, trackable, and resolvable rather than embedded in a static image.
What are the main use cases for screenshot annotation in UX work?
The five most common annotation use cases in UX design:
1. Competitor UI analysis. Annotating screenshots of competitor products to document what design decisions they made and what can be adapted or improved. These annotations live in a research library for ongoing reference.
2. Usability testing documentation. Annotating session recording screenshots to mark where users struggled, where they paused, and where they expressed confusion. Time-stamped annotations tied to specific screen states.
3. QA and bug reporting. Annotating screenshots of live products to mark visual bugs, spacing inconsistencies, and contrast failures with precise location markers. This is the most common enterprise annotation use case.
4. Design specification. Annotating mockup screenshots with measurements, behavior notes, and component specifications for developer handoff. Complementary to Figma's native comment and dev mode features.
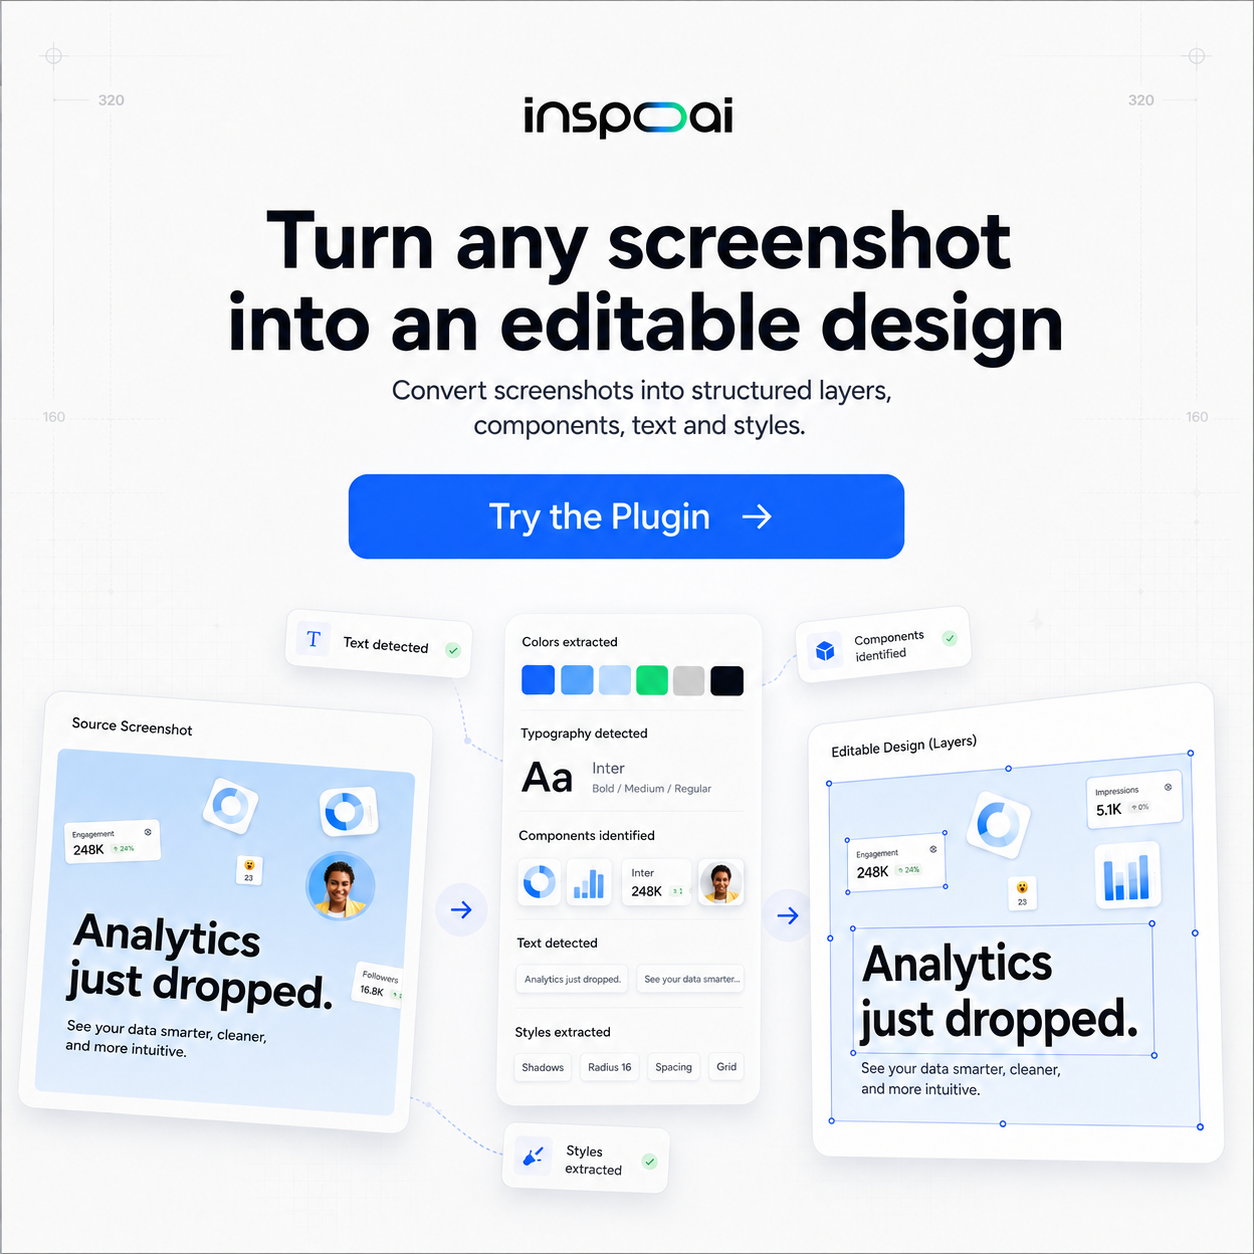
5. Research documentation. Annotating captured inspiration screenshots with notes about what specifically made the design interesting. This is where InspoAI's notes system on captured references sits: each screenshot in your library can carry design analysis notes that make the reference useful for months after capture.
Which screenshot annotation tools are most popular among UX teams?
Markup.io: Browser-based annotation tool. Draw, type, and add callouts directly on screenshots or live web pages. Comments are threaded and resolvable. Good free tier. Best for: ad hoc feedback on web pages.
BugSmash: Annotation and feedback platform covering screenshots, videos, and websites. Used by QA teams and designers for visual bug reporting. Clean interface, good team collaboration. Best for: QA and development feedback loops.
Beep (JustBeepIt): Website annotation focused on speed. Claims to help teams review websites four times faster. Integrates with project management tools. Best for: fast feedback cycles on live staging environments.
Skitch by Evernote: Simple, fast desktop annotation tool. Arrows, boxes, blur, text. No collaboration. Best for: solo annotations intended for personal notes or single-recipient sharing.
Figma with Dev Mode: Not strictly an annotation tool, but Figma's comment and dev mode features cover most developer handoff annotation needs natively. Best for: design-to-development specifications when designs live in Figma.
Annotate.io: Lightweight web annotation focused on URL-based feedback. Stakeholders annotate live URLs without needing design tool access. Best for: client feedback on live websites. Source: BugSmash
For research documentation specifically, InspoAI's notes field on each captured screenshot serves as the annotation layer for design research: you write what you noticed, and that note travels with the screenshot permanently.
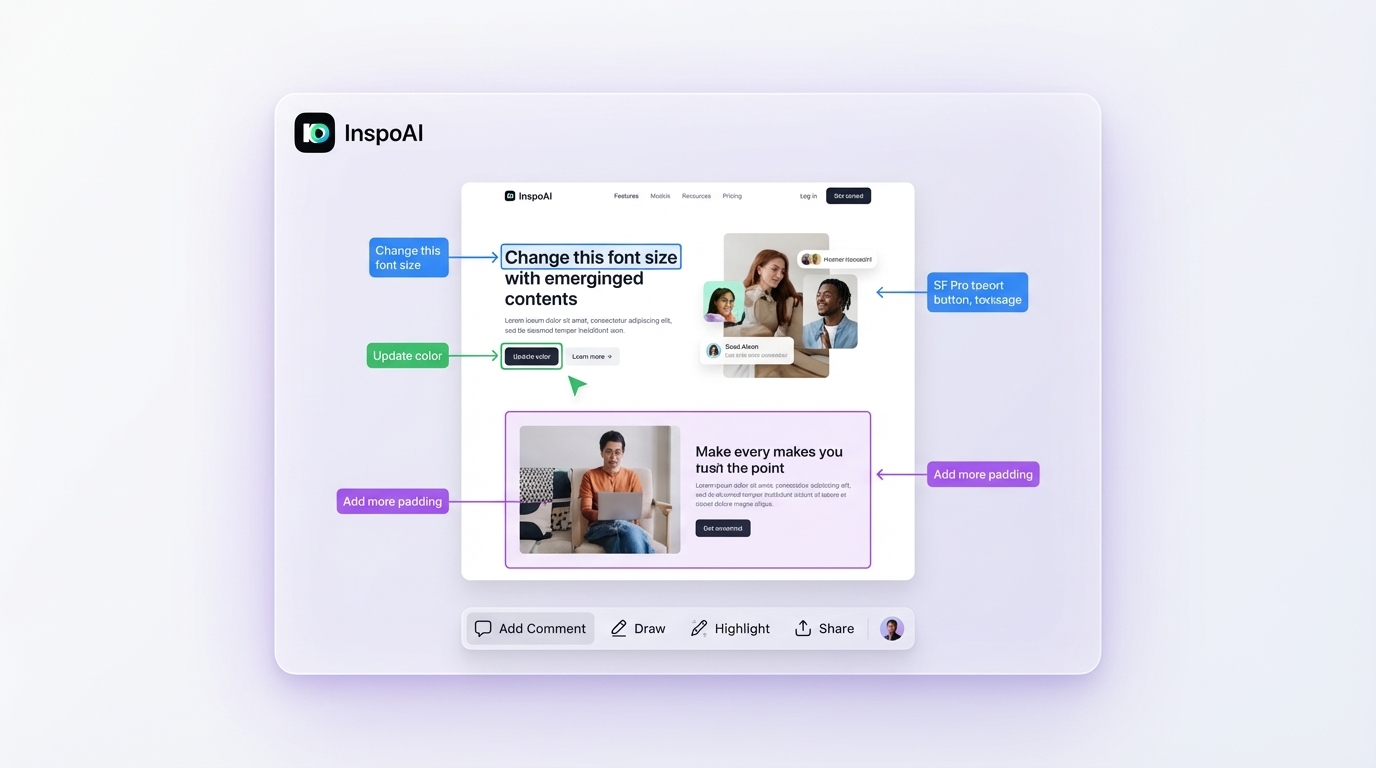
How do you annotate screenshots for developer handoff?
Developer handoff annotations need to answer three questions: what does this look like exactly, what does it do, and what happens in edge cases.
Measurements: Annotate all spacing values (padding, margin, gap), component dimensions, font sizes, and border radii. Use a consistent color code: blue for spacing, red for typography, green for color values.
Behavior: For interactive elements, annotate each state (default, hover, focus, active, disabled, error, success) with brief descriptions. "On hover: background transitions to #F5F5F5, cursor: pointer" is a useful handoff annotation.
Edge cases: Annotate what the UI should do when content is truncated, when lists exceed expected length, when images fail to load, and when form validation triggers. These edge cases are the most common source of developer-designer back-and-forth.
Reference links: When your annotation is based on a design decision informed by a research reference, link to the reference. An annotation that says "See InspoAI collection 'Form Validation Patterns' for reference examples" gives developers context for why a decision was made.
The best handoff annotations are written to be understood by someone with no context about the design process. Write as if the developer is reading this annotation six months from now, long after all the context meetings have been forgotten. Source: HYPE4.Academy
What makes a good annotation: common mistakes to avoid?
Common mistakes:
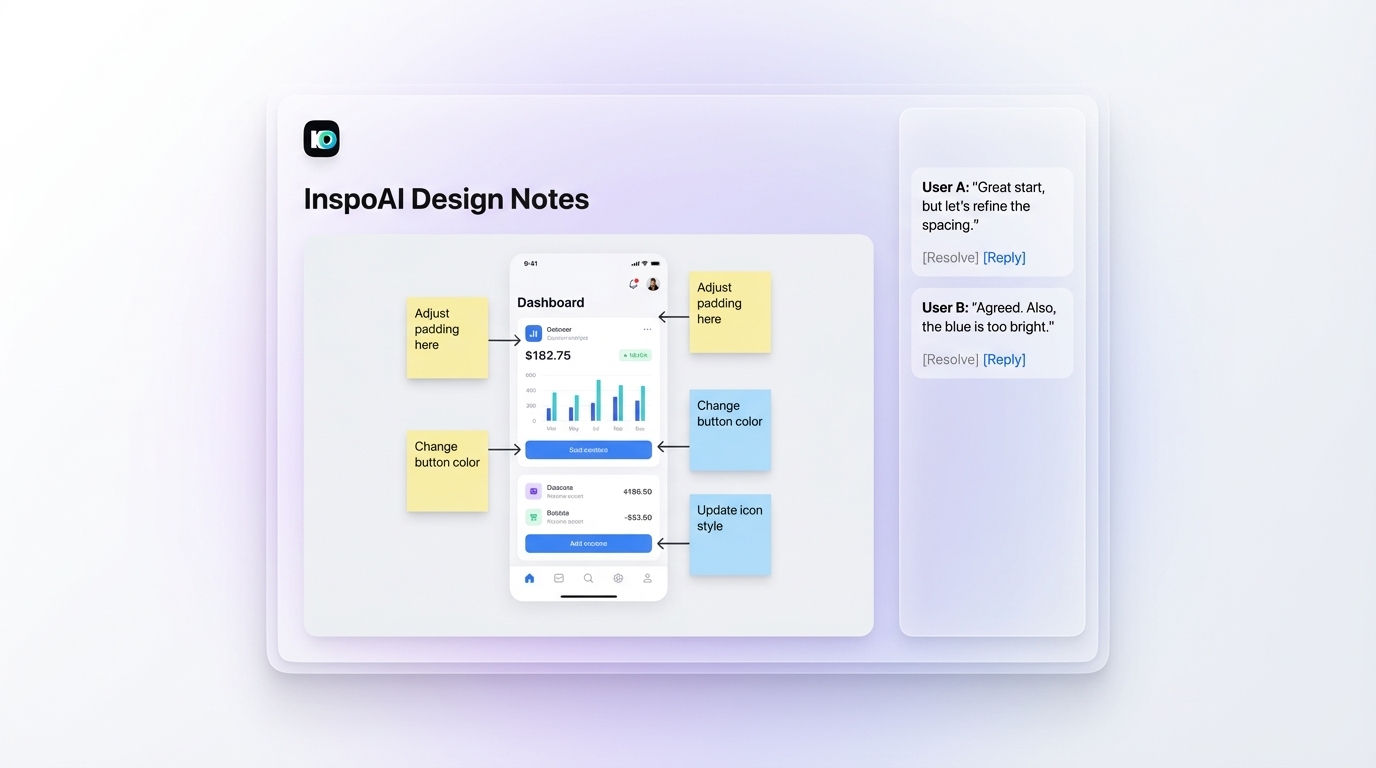
Over-annotating. An annotation layer with 40 callouts on a single screenshot is unreadable. Annotate the non-obvious decisions, not everything. If something is self-explanatory from the design, it does not need an annotation.
Vague annotations. "Make this look better" is not an annotation. "Increase button padding from 8px to 12px vertical, 16px to 20px horizontal to improve touch target size" is an annotation.
Annotations without resolution states. In team workflows, unanswered annotations become invisible debt. Use tools with explicit resolve/close states so the team knows which feedback has been addressed.
Annotating on compressed images. JPEG compression artifacts make pixel-level annotations (pointing to a specific 1px border) inaccurate. Always annotate on PNG screenshots for precision work.
Not versioning annotations. When a design changes, old annotations on previous screenshots become confusing rather than helpful. Archive or delete annotations tied to superseded design versions.
Good annotation habits:
- Use numbered callouts with a separate legend for complex screens
- Write annotations in present tense ("Button is 40px height") rather than instructional tense ("Make button 40px") to describe intent rather than commands
- Include WHY alongside WHAT: "Border-radius is 8px to match the card component border-radius throughout the product"
Source: Reddit r/nocode annotation tools
How do screenshot annotations differ from Figma comment workflows?
Figma's native comment system and dedicated screenshot annotation tools serve different parts of the design workflow.
Figma comments work best when both parties (designer and commenter) have Figma access. Comments pin to specific elements in the design file, survive design updates (the pin moves with the element), and integrate with Figma's notification system. Best for: internal design team discussions on active design files.
Screenshot annotation tools work best when the audience does not have or should not need Figma access. Stakeholders, clients, and developers who do not use Figma daily find it easier to annotate a screenshot via a browser link than to navigate Figma. Best for: client reviews, stakeholder sign-off, QA on live products.
The practical workflow for many teams: use Figma comments for internal design iteration, use a screenshot annotation tool like Markup.io or Beep for stakeholder and client reviews, and use Figma Dev Mode for developer handoff specifications.
This separation keeps Figma files clean from external stakeholder feedback while giving non-Figma users a friction-free way to provide precise visual feedback. InspoAI sits in this ecosystem as the research and inspiration layer: captured screenshots with notes and design analysis, separate from the production annotation and feedback workflows. Source: JustBeepIt
Can screenshot annotation tools support async design feedback on remote teams?
Yes, and asynchronous annotation is one of the strongest use cases for dedicated annotation tools. The alternative to async annotation is synchronous screen-share review meetings, which are expensive in time and timezone-dependent.
A well-structured async annotation workflow:
1. Designer shares a link to an annotated screenshot or annotated live URL through a tool like Markup.io or Beep. No file download required from the reviewer.
2. Reviewers add their annotations on their own schedule. Comments are threaded to the specific element being discussed.
3. Designer resolves comments and marks them done. Resolved comments are archived, not deleted, providing a decision audit trail.
4. Next iteration begins with a fresh annotation cycle on the updated design.
This workflow eliminates "did you see my feedback?" follow-up messages because all feedback is in one place, timestamped, and resolvable. For distributed design teams, this is the equivalent of the real-time design critique that in-office teams conduct in person.
The key is choosing a tool where the sharing step is truly zero-friction: a link that a stakeholder can open in any browser without creating an account. Tools that require reviewer sign-up before annotating have dramatically lower participation rates. Source: HYPE4.Academy
Conclusion
Screenshot annotation tools close the communication gap between design intent and implementation. The choice between tools depends on your primary use case: Figma comments for internal design collaboration, Markup.io or Beep for external stakeholder review, and InspoAI's notes system for design research documentation.
Build a research annotation library with InspoAI at inspoai.io and start attaching structured design analysis to every reference you capture.